2ヶ月前にMirageOS Unikernelに出会って以降、Virtualbox環境ではKemp LoadMasterを立ち上げてロードバランサの挙動の勉強を進める傍ら、時々Ubuntu 18.04.3を立ち上げてはMirageOSで遊んでいた。たまにMirageOS熱が再来する...といった感じだ。
前回はUbuntu 18.04環境にてMirageOSを動作させたが、今年の4月にリリースされた最新版の20.04でも正常に動作するか、OCamlやMirageのバージョンを最新版にしても正常に動作するか気になった。
今回は、Ubuntu Linuxの最新バージョン20.04に、MirageOSおよびOCamlの最新版のインストールとHello Worldの実行を試みた。
※前々回:https://debslink.hatenadiary.jp/entry/20200516/1589616362
※前回:https://debslink.hatenadiary.jp/entry/20200526/1590495778
当方の環境
ホストOS:Windows7 32bit版 / RAM: 4GB / CPU: Intel Core i3-2350M 2.30GHz
ゲストOS:Ubuntu Server 20.04 x86 64bit版
Virtualbox 5.2.32
Ubuntu Serverは既にデプロイ済みである事とする
PCのCPU仮想化支援機構はBIOSにて既に有効設定済みである事とする
入れたいバージョン
mirage 3.8.0
ocaml-base-compiler 4.10.0
OCaml 4.12.0
MirageOSのインストール手順は、前回の記事(https://debslink.hatenadiary.jp/entry/20200516/1589616362)の内容に従った。
今回も、自分の環境ではhvtオプション下でのHello Worldが正常に実行出来なかった為、VirtioオプションでコンパイルしHello World実行プログラムを生成させて実行した。
MirageOSとは何ぞや、OCamlとは何ぞや...に関しては、当記事下部のリンク先を参照。
CPU仮想化支援機構の有効無効の確認
前回のバージョン18.04.3ではCPU仮想化支援機構が有効であるか確認で使用するコマンドlscpuはデフォルトでインストールされていなかった為に、別途apt-getコマンドでインストールしたが、現バージョン20.04ではインストール済みにつき、パッケージリストの更新のみ実行した。
$ sudo apt-get update
$ sudo apt-get upgrade
lscpuコマンドを叩き、CPU仮想化支援機構が有効になっている事を確認。
自分の環境では、Virtualization typeがnone等ではなくVT-xやfull、Hypervisor vendorがKVMになっている。
$ lscpu
Architecture:                    x86_64
CPU op-mode(s):                  32-bit, 64-bit
Byte Order:                      Little Endian
:
:
Hypervisor vendor:   KVM
Virtualization type: full
:
以下のコマンドを打ち、KVMモジュールを読み込ませる。
$ sudo modprobe kvm
MirageOSインストールの準備
MirageOS上で実行するプログラムはOCamlという関数型プログラミング言語で記述される。MirageOSのインストール前に、OCamlおよびコンパイラocamlと管理ツールopam、それらを動作させる為に必要なツールをインストール。
前回同様に外部のリポジトリを利用する為、add-apt-repository ppa:avsm/ppaを最初に打ったが...
$ sudo add-apt-repository ppa:avsm/ppa
 Latest stable versions of OCaml and OPAM.
 More info: https://launchpad.net/~avsm/+archive/ubuntu/ppa
Press [ENTER] to continue or Ctrl-c to cancel adding it.

Hit:1 http://jp.archive.ubuntu.com/ubuntu focal InRelease
Hit:2 http://jp.archive.ubuntu.com/ubuntu focal-updates InRelease
Hit:3 http://jp.archive.ubuntu.com/ubuntu focal-backports InRelease
Hit:4 http://jp.archive.ubuntu.com/ubuntu focal-security InRelease
Ign:5 http://ppa.launchpad.net/avsm/ppa/ubuntu focal InRelease
Err:6 http://ppa.launchpad.net/avsm/ppa/ubuntu focal Release
  404  Not Found [IP: 2001:67c:1560:8008::15 80]

E: The repository 'http://ppa.launchpad.net/avsm/ppa/ubuntu focal Release' does not have a Release file.
N: Updating from such a repository can't be done securely, and is therefore disabled by default.
N: See apt-secure(8) manpage for repository creation and user configuration details.
$
何と、404 Not Foundときた。
「The repository 'http://ppa.launchpad.net/avsm/ppa/ubuntu focal Release' does not have a Release file.」と言っているではないか !
http://ppa.launchpad.net/avsm/ppa/ubuntuをWebブラウザでアクセスすると、確かにfocalディレクトリが存在しない。focalとはUbuntu 20.04のコードネームFocal Fossaに由来する。
18.04や16.04など他のバージョンの場合、http://ppa.launchpad.net/avsm/ppa/ubuntu配下にコードネーム由来のディレクトリ名を当てられたディレクトリが有るのだが、20.04にはまだ存在しない。
Ubuntu 20.04環境への導入は時期早々か?
試しに、外部のリポジトリを使用せずに、行けるところまで行ってみよう。
...という事で、前回同様にOCamlやopam、必要なツールのインストールを進める。
$ sudo apt-get install opam ocaml gcc make bubblewrap m4 pkg-config qemu-kvm libvirt-bin bridge-utils virt-manager libseccomp-dev
:
Package libvirt-bin is not available, but is referred to by another package.
This may mean that the package is missing, has been obsoleted, or
is only available from another source

E: Package 'libvirt-bin' has no installation candidate
E: Unable to locate package bridge-utills
$
エラーを吐いてapt-getが終了した。Googleで"Ubuntu 20.04 libvirt-bin"で検索したところ、libvirt-binは18.04で削除されたようだ。
代わりに、libvirt-daemon-systemとlibvirt-clients を入れる。
https://symfoware.blog.fc2.com/blog-entry-2446.html
https://askubuntu.com/questions/1089753/kvm-qemu-installation-issue-18-10
bridge-utillsはtypoだった。
bridge-utilsに修正し、libvirt-binの代わりに提示されたツールlibvirt-daemon-systemとlibvirt-clientsを指定し、再度実行。
$ sudo apt-get install opam ocaml gcc make bubblewrap m4 pkg-config qemu-kvm bridge-utils virt-manager libvirt-daemon-system libvirt-clients libseccomp-dev
:
:
Unpacking bridge-utils (1.6-2ubuntu1) ...
Setting up bridge-utils (1.6-2ubuntu1) ...
Processing triggers for man-db (2.9.1-1) ...
$
今度は正常に完了した。
opamの環境設定
ocamlおよびopamのインストール完了後、opamの環境設定に進む。
opam init実行中に2度質問される。
Do you want opam to modify ~/.profile? [N/y/f]
(default is 'no', use 'f' to choose a different file) では、Enterキーを叩いて先に進める。
A hook can be added to opam's init scripts to ensure that the shell remains in sync with the opam environment when theyare loaded. Set that up? [y/N]
では、Enterキーを叩いて先に進める。
$ opam init
[NOTE] Will configure from built-in defaults.
Checking for available remotes: rsync and local, git, mercurial, darcs. Perfect!

<><> Fetching repository information ><><><><><><><><><><><><><><><><><><><><><>
]Processing  1/1: [default: http][default] Initialised

<><> Required setup - please read <><><><><><><><><><><><><><><><><><><><><><><>
:
:
Do you want opam to modify ~/.profile? [N/y/f]
(default is 'no', use 'f' to choose a different file)

A hook can be added to opam's init scripts to ensure that the shell remains in sync with the opam environment when they
are loaded. Set that up? [y/N]

<><> Processing actions <><><><><><><><><><><><><><><><><><><><><><><><><><><><>
? installed base-bigarray.base
? installed base-threads.base
? installed base-unix.base
? installed ocaml-system.4.08.1
? installed ocaml-config.1
? installed ocaml.4.08.1
Done.
# Run eval $(opam env) to update the current shell environment
$
「Run eval $(opam env) to update the current shell environment」と言っている為、eval $(opam env)を実行し環境変数を設定。
$
$ eval $(opam env)
$
ここで、インストールされたopamコンパイラのバージョンを確認。
前回はバージョン4.05.0だったが今回は4.08.1にバージョンが上がっていて、MirageOSの動作に必要とするバージョンを満たしているが、もっと新しいバージョンで動かしたい。
よって、バージョンを指定しopam switch createコマンドを実行。
今回は最新版の4.10.0を入れてみる。
自分の環境では、Processing 4/12: [ocaml-base-compiler: make world]で40分程待たされた。
$ opam switch list
#  switch   compiler             description
→  default  ocaml-system.4.08.1  default
$
$
$ opam switch create 4.10.0
<><> Gathering sources ><><><><><><><><><><><><><><><><><><><><><><><><><><><><>
Processing  5/6: [ocaml-base-compiler.4.10.0: dl]
Processing  6/6: [ocaml-base-compiler.4.10.0: dl]
[ocaml-base-compiler.4.10.0] downloaded from cache at https://opam.ocaml.org/cache
Processing  6/6:
<><> Processing actions <><><><><><><><><><><><><><><><><><><><><><><><><><><><>
Processing  4/12: [ocaml-base-compiler: ./configure]
Processing  4/12: [ocaml-base-compiler: make world]
Processing  4/12: [ocaml-base-compiler: make world.opt]
? installed base-bigarray.base
? installed base-threads.base
? installed base-unix.base
? installed ocaml-base-compiler.4.10.0
? installed ocaml-config.1
? installed ocaml.4.10.0
Done.
# Run eval $(opam env) to update the current shell environment
$
インストール後、opamのコンパイラのバージョンが4.10.0になっている事を確認。
しかし、上記のログを見るとOCamlのバージョンは4.10.0でインストールされた事が分かる。どうやらこちらでは指定出来ず、opamのバージョンと連動しているのだろう。
$ opam switch list
#  switch   compiler                    description
→  4.10.0   ocaml-base-compiler.4.10.0  4.10.0
   default  ocaml-system.4.08.1         default
$
MirageOSのインストール
次に、opam install mirageコマンドを打ち、MirageOSとMirageOSの実行に必要なツールをインストール。
自分の環境では、完了まで約30分程要した。
$ opam install mirage
The following actions will be performed:
  ? install dune              2.6.1  [required by mirage]
  ? install seq               base   [required by fmt]
  ? install cmdliner          1.0.4  [required by functoria]
  ? install conf-m4           1      [required by ocamlfind]
  ? install ocamlbuild        0.14.0 [required by astring, bos]
  ? install stdlib-shims      0.1.0  [required by mirage]
  ? install result            1.5    [required by rresult, fpath, ptime]
:
省略
:
  ? install mirage-runtime    3.8.0  [required by mirage]
  ? install bos               0.2.0  [required by mirage]
  ? install functoria         3.1.1  [required by mirage]
  ? install mirage            3.8.0
===== ? 31 =====
Do you want to continue? [Y/n] y
:
省略
:
? installed mirage-runtime.3.8.0
? installed ptime.0.8.5
? installed rresult.0.6.0
? installed bos.0.2.0
? installed functoria.3.1.1
? installed mirage.3.8.0
Done.
$
インストール完了後、opam listコマンドを実行。
これまでの流れでインストールされたMirageOSやOCamlやopam、関連するツールの一覧とバージョンが出力される。
$ opam list
# Packages matching: installed
# Name              # Installed # Synopsis
astring             0.8.4       Alternative String module for OCaml
base-bigarray       base
base-bytes          base        Bytes library distributed with the OCaml compiler
base-threads        base
base-unix           base
:
省略
:
mirage              3.8.0       The MirageOS library operating system
mirage-runtime      3.8.0       The base MirageOS runtime library, part of every MirageOS unikernel
mmap                1.1.0       File mapping functionality
ocaml               4.10.0      The OCaml compiler (virtual package)
ocaml-base-compiler 4.10.0      Official release 4.10.0
:
省略
:
seq                 base        Compatibility package for OCaml's standard iterator type starting from 4.07.
stdlib-shims        0.1.0       Backport some of the new stdlib features to older compiler
topkg               1.0.1       The transitory OCaml software packager
$
インストールされたMirageOSのバージョンを確認。
$ mirage --version
v3.8.0
$
Hello Worldプログラムのコンパイルとインストール
MirageOSやその周辺のツールのインストールは、ほぼ自分が希望するバージョンでインストール出来た。
次は、Hello Worldプログラムのコンパイルとインストールに進む。
前回同様、OCamlでHello Worldプログラムを1から書くのではなく、MirageOSの公式githubからホームディレクトリに持ち出す。
clone完了後、lsコマンドを打つとmirage-skeletonディレクトリが作成されている事が確認出来る。
このmirage-skeletonディレクトリ配下にHello Worldのアプリケーションファイル(unikernel.ml)と構成ファイル(config.ml)が有る為、cdコマンドで移動する。
$ git clone https://github.com/mirage/mirage-skeleton.git
Cloning into 'mirage-skeleton'...
remote: Enumerating objects: 3321, done.
remote: Counting objects:   0% (1/3321)
remote: Counting objects:  1% (2/3321)
remote: Counting objects:   2% (3/3321)
:
省略
:
Resolving deltas:  99% (1639/1665)
Resolving deltas: 100% (1642/1665)
Resolving deltas: 100% (1665/1665), done.
$
$ ls
mirage-skeleton
$
$ cd mirage-skeleton/tutorial/hello
$
$ ls
config.ml  unikernel.ml
$
今回もVirtioオプションを付け、Hello Worldプログラムのコンパイルを実行。
コンパイル完了まで3つのコマンドを打つ必要が有る。
最初はVirtioオプションを付けてmirage configureコマンドを叩き、コンパイルに必要なファイルを生成させる。
$ mirage configure -t virtio
Scanned 0 directories          Done: 0/0 (jobs: 0)       hoge@hoge:~/mirage-skeleton/tutorial/hello$
$
$ ls
_build     dune        dune.config   hello_libvirt.xml  main.ml   mirage-unikernel-hello-virtio.opam  unikernel.ml
config.ml  dune.build  dune-project  key_gen.ml         Makefile  myocamlbuild.ml
$
次にmake dependコマンドを打ち、依存関係の有るopamツールおよびUbuntuのパッケージを自動でインストール。
make depend実行中に2度質問される。
Package mirage-unikernel-hello-virtio does not exist, create as a NEW package? [Y/n]
では yキーを叩いてopamツールのインストールを進める。
Opam plugin "depext" is not installed. Install it on the current switch? [Y/n]
では yキーを叩いてdepextのインストールを進める。
$ make depend
opam pin add -k path --no-action --yes mirage-unikernel-hello-virtio . && opam depext --yes --update mirage-unikernel-hello-virtio ; opam pin remove --no-action

mirage-unikernel-hello-virtio
Package mirage-unikernel-hello-virtio does not exist, create as a NEW package? [Y/n] y
Processing: [mirage-unikernel-hello-virtio.~dev: rsync]
[mirage-unikernel-hello-virtio.~dev] synchronised from file:///home/hoge/mirage-skeleton/tutorial/hello
[WARNING] Failed checks on mirage-unikernel-hello-virtio package definition from source at
          file:///home/hoge/mirage-skeleton/tutorial/hello:
  warning 37: Missing field 'dev-repo'
  warning 49: The following URLs don't use version control but look like version control URLs:
              "https://github.com/mirage/mirage-skeleton.git#master"
mirage-unikernel-hello-virtio is now pinned to file:///home/hoge/mirage-skeleton/tutorial/hello (version ~dev)
Opam plugin "depext" is not installed. Install it on the current switch? [Y/n] y
The following actions will be performed:
  ? install opam-depext 1.1.3

<><> Gathering sources ><><><><><><><><><><><><><><><><><><><><><><><><><><><><>
:
省略
:
? installed ocaml-freestanding.0.6.0
? installed mirage-solo5.0.6.2
? installed mirage-bootvar-solo5.0.6.0
Done.
$
最後にmakeコマンドを打ち、Hello Worldのアプリケーションバイナリファイルhello.virtioと、仮想マシンのバイナリファイルsolo5-virtio-runを生成。
完了後、lsコマンドの実行でhello.virtioが当フォルダ内に有る事を確認。
※ここで言うアプリケーションバイナリファイルとはMirageOS側、仮想マシンとはUbuntu側を指す。
※Solo5とはUnikernel向けのサンドボックス環境の事。Unikernelを動作させる為のセキュアな環境と、UnikernelとSolo5が接する箇所の共通的なAPを提供する。
Hello WorldとMirageOSとSolo5の関係を簡単に表現すると、以下の図のような感じ。
当記事で触れている箇所を赤枠で示した。
OSの中にOSが有るのは変に見えるが、本来はXenなどHypervisor上で動作する。
MirageOSとHello Worldプログラムは1対1で動作する。よってFTPプログラムやWebサーバプログラムを動作させたい場合は、FTPプログラムを動作させる為のMirageOS、Webブラウザを動作させる為のMirageOSが必要となる。

Linux環境でソースから./configure、make、make installでツールをインストールする時のmakeとは異なり、ほんの2~3秒程で終了する。
lsでhello.virtioファイルが生成されている事を確認すれば、長かったHello Worldのコンパイルとインストール作業は完了。
今時のPCだったらもっともっと早く完了していただろうけど。
$ make
mirage build
Scanned 0 directories      Done: 0/0 (jobs: 0)      config.exe: [WARNING] pkg-config solo5-bindings-virtio --variable=ld returned nothing, using ld
$
$ ls
_build     dune        dune.config   hello_libvirt.xml  key_gen.ml  Makefile                            myocamlbuild.ml
config.ml  dune.build  dune-project  hello.virtio       main.ml     mirage-unikernel-hello-virtio.opam  unikernel.ml
$
Hello Worldプログラムの実行
ついにHello World実行まで漕ぎ着けた。
次は動作確認。
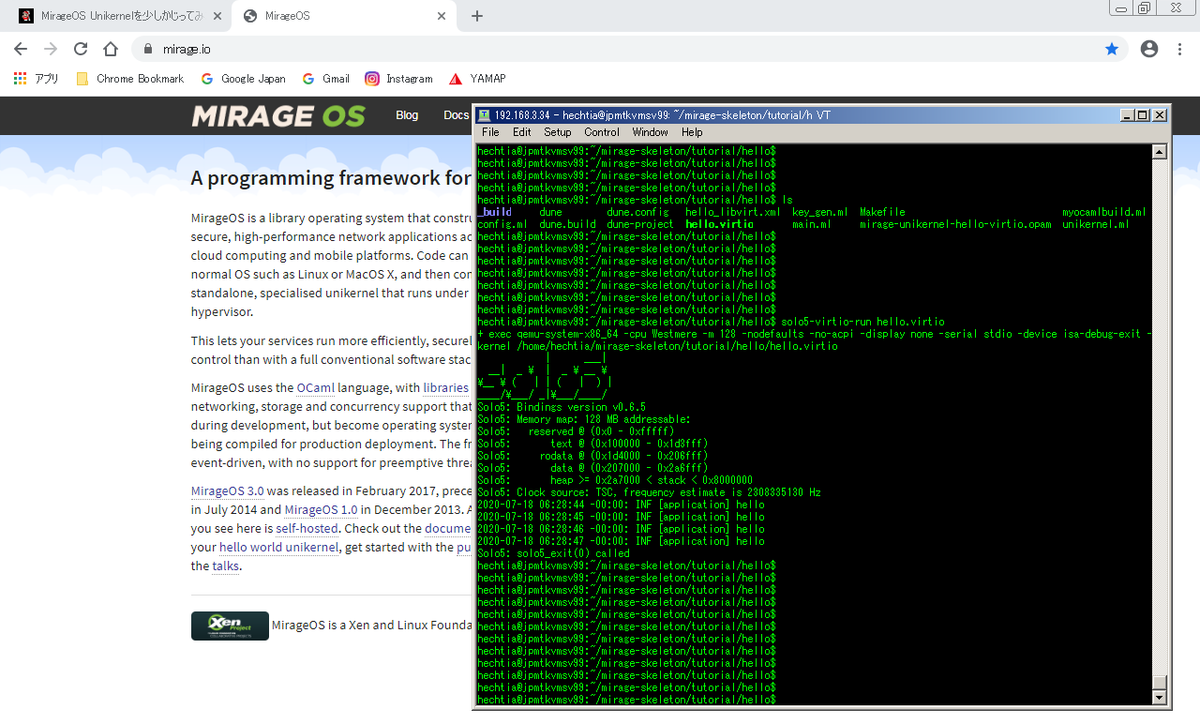
仮想マシンバイナリファイルsolo5-virtio-runでアプリケーションバイナリhello.virtioを実行させる。
アスキーアートのロゴの出力とhelloが4回出力されれば、MirageOSのインストールおよびHello Worldプログラムの生成は成功となる。
$ solo5-virtio-run hello.virtio
+ exec qemu-system-x86_64 -cpu Westmere -m 128 -nodefaults -no-acpi -display none -serial stdio -device isa-debug-exit -kernel /home/hoge/mirage-skeleton/tutorial/hello/hello.virtio

            |      ___|
  __|  _ /  |  _ / __ /
/__ / (   | | (   |  ) |
____//___/ _|/___/____/
Solo5: Bindings version v0.6.5
Solo5: Memory map: 128 MB addressable:
Solo5:   reserved @ (0x0 - 0xfffff)
Solo5:       text @ (0x100000 - 0x1d3fff)
Solo5:     rodata @ (0x1d4000 - 0x206fff)
Solo5:       data @ (0x207000 - 0x2a6fff)
Solo5:       heap >= 0x2a7000 < stack < 0x8000000
Solo5: Clock source: TSC, frequency estimate is 2308335130 Hz
2020-07-18 06:28:44 -00:00: INF [application] hello
2020-07-18 06:28:45 -00:00: INF [application] hello
2020-07-18 06:28:46 -00:00: INF [application] hello
2020-07-18 06:28:47 -00:00: INF [application] hello
Solo5: solo5_exit(0) called
$
$
Hello Worldの実行は成功、前回のMitageOS バージョン3.7.7との間で実行時間以外の出力内容は同じ。
今回の振り返り。外部リポジトリppa:avsm/ppaを使わなくても、OCamlやopamのインストールが出来た。
MirageOSのバージョンは指定しなくても最新版の3.8.0がインストールされた。
opamのコンパイラはこちらで指定可能(自動でインストールされた後、導入したいバージョンを後で指定しインストール)だったものの、 OCaml のバージョンはopamのコンパイラと同じバージョンのものが自動でインストールされた。
次回は簡単なFTPサーバもしくはWebサーバをMirage OSで立てたい。業務でUnikernelやMirageOSの案件にアサインされる事は無いだろうから、急がずゆっくりと...
リンク先
https://mirage.io/ Mirage OS
https://github.com/mirage Mirage OS (github)
https://ocaml.org/ OCaml
https://releases.ubuntu.com/20.04/ Ubuntu 20.04
https://github.com/Solo5/solo5 Solo5
Mirage、OCaml、他各ツールの最新バージョンは以下のリンク先で検索し確認可能。
画面右上の「Search Packages」の窓内にパッケージ名を入力し検索。
https://opam.ocaml.org/packages/
他のMirageOSのエントリ
https://debslink.hatenadiary.jp/entry/20200815/1597493701 追記:MirageOS Unikernelでデータベース
https://debslink.hatenadiary.jp/entry/20200726/1595768920 追記:MirageOS UnikernelでWebサーバ
https://debslink.hatenadiary.jp/entry/20200526/1590495778 前々回:MirageOS Unikernelで通信プログラムの実行
https://debslink.hatenadiary.jp/entry/20200516/1589616362 初回:MirageOSのインストールとHello Worldの実行
自分にとって、UnikernelsやMirageOSの始めの一歩となったサイト (MirageOS のインストールから Hello World までを試す)
https://qiita.com/t-imada/items/6ee299653ac063532b4f