前回はOcNOS VMのvmdkファイルの入手とVMware Fusionへのデプロイを行い、初期設定としてホスト名やsshログインの為の設定等を実施した。
OcNOS VMは他の仮想アプライアンスのような評価版ライセンスを適用させる作業は無い為、デプロイ完了後はすぐに設定や疎通確認等を試す事が可能である。今回はCisco CSR1000vを別途デプロイしOcNOS VMとCisco CSR1000vをホスト機の内部で仮想的に接続させ、BGPピアを張ってみた。
前回の記事 https://debslink.hatenadiary.jp/entry/20240316/1710567015 OcNOSをVMware Fusionで動かす
OcNOSとは
OcNOSの販売元であるIP Infusion社の創立者である石黒氏が開発したルーティングソフトウェアGNU Zebraの機能強化版であるZebOSを元に開発された、ホワイトボックススイッチ用のNOS(Network Operating System)である。ZebOSの機能はOcNOSに含まれており、OcNOS内部ではコントロールプレーンの役割を担い、データパケットの転送や経路情報の制御等を行う。
OcNOSはサポートする機能により、以下の4つのソリューションが用意されている。
・OcNOS AGGR (OcNOS SP)
サービスプロバイダ向けに固定アクセスエッジおよびメトロネットワークの集約機能を提供。
・OcNOS CSR (OcNOS SP)
サービスプロバイダ向けにモバイルネットワークのバックホールを提供。
・OcNOS DC
L2/L3データセンタスイッチとして、ルーティングやスイッチングやEVPN-VXLAN等の機能を提供。
・OcNOS RON
データセンタの相互接続、RAN高密度化のためのバックホール、メトロリングトポロジ等オプティカルネットワーキングをサポート。
前回および当記事にて動作させているOcNOSはOcNOS VMと呼ばれるOcNOSの仮想アプライアンス版で、L2やL3やMPLS等の機能をテストする為のものである。
デモ版につき全ての機能が動作するわけではなく、MPLSやデータプレーンの一部の機能等は動作しない。
当方の環境
ホスト機:macOS 14.3.1 / MacBook Pro 2020 / RAM: 16GB / CPU: Intel Core i5 2.0GHz
仮想化環境①:VMware Fusion 12.2.5
ゲスト機①:OcNOS 6.3.0-126
仮想化環境②:Oracle VirtualBox 7.0.14
ゲスト機②:Cisco CSR1000v 3.14.0
ざっくりとした要件
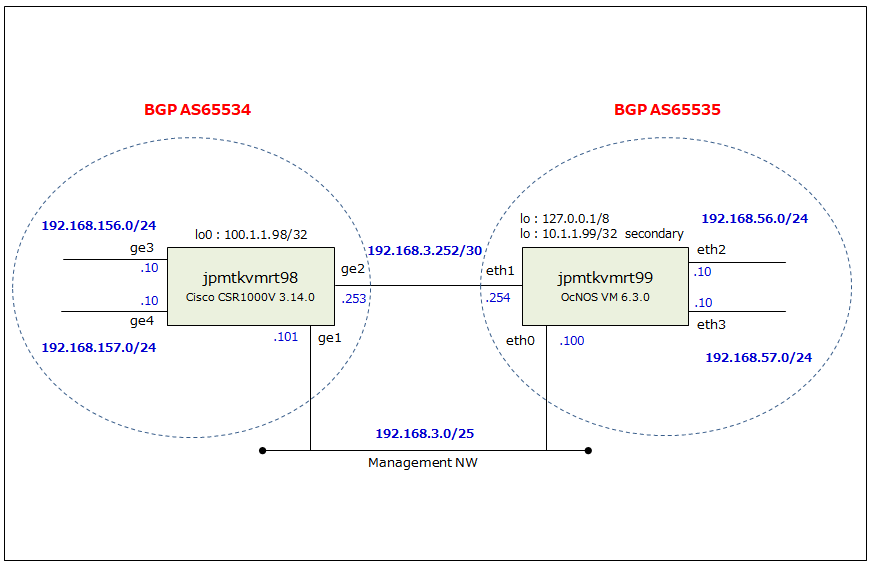
以下のような要件で構成を組む。
OcNOS VMは前回の記事にてデプロイした環境に設定を追加したものを使用し、Cisco CSR1000vはVirtualBoxにデプロイしたものにOcNOSとほぼ同じ設定をしたものを使用する。
OcNOS VMとCisco CSR1000vはeBGPでピアを張り、OcNOS VMとCisco CSR1000v共にローカル側のネットワークをBGPを介してアドバタイズする。
今回はOcNOS VMのコマンドの構文と動作確認が主目的である為、OcNOS VM側ではeBGPの他に単純な構成のルートマップの設定を追加している。
※図をクリックすると拡大表示します
OcNOS VMの設定
これよりOcNOS VMの設定に着手する。
前回の記事にて少し言及したとおり、OcNOS VMのコマンドは業界標準と呼ばれる某C社のものに酷似している為、業務にて某C社のルータやスイッチに触れている者であればOcNOSのコマンドにすぐに慣れるだろう。
今回はBGPの設定に入る前に、他に必要なインターフェースやスタティックルートの設定追加を行う。
1.インターフェースの設定
前回の記事にてIPアドレスをアサインしたeth0を含め以下の4つのインターフェースに対し、IPアドレスとデスクリプションを設定。
・eth0:外向きインターフェース、管理用、IPアドレス は前回の記事で設定済
・eth1:外向きインターフェース
・eth2:ローカル側のインターフェース
・eth3:ローカル側のインターフェース
・lo:ループバックインターフェース
loの既存設定は修正や削除が出来ない為、secondaryオプションを付けてIPアドレスを追加する
尚、ここでホスト名を前回設定したtest01からjpmtkvmrt99に変更している。
test01>en
Password:
test01#
test01#conf t
Enter configuration commands, one per line.  End with CNTL/Z.
test01(config)#
test01(config)#hostname jpmtkvmrt99
test01(config)#
test01(config)#commit
jpmtkvmrt99(config)#
jpmtkvmrt99(config)#interface eth0
jpmtkvmrt99(config-if)#description *** To Management NW ***
jpmtkvmrt99(config-if)#exit
jpmtkvmrt99(config)#
jpmtkvmrt99(config)#interface eth1
jpmtkvmrt99(config-if)#ip address 192.168.3.254/30
jpmtkvmrt99(config-if)#description *** To jpmtkvmrt98 ge1 ***
jpmtkvmrt99(config-if)#
jpmtkvmrt99(config-if)#exit
jpmtkvmrt99(config)#
jpmtkvmrt99(config)#interface eth2
jpmtkvmrt99(config-if)#ip address 192.168.56.10/24
jpmtkvmrt99(config-if)#description *** To jpmtkvmsw01 ge0/0/0 ***
jpmtkvmrt99(config-if)#exit
jpmtkvmrt99(config)#
jpmtkvmrt99(config)#interface eth3
jpmtkvmrt99(config-if)#ip address 192.168.57.10/24
jpmtkvmrt99(config-if)#description *** To jpmtkvmsw02 ge0/0/0 ***
jpmtkvmrt99(config-if)#exit
jpmtkvmrt99(config)#
jpmtkvmrt99(config)#interface lo
jpmtkvmrt99(config-if)#ip address 10.1.1.99/32 secondary
jpmtkvmrt99(config-if)#description *** Monitoring/Polling ***
jpmtkvmrt99(config-if)#
jpmtkvmrt99(config-if)#commit
jpmtkvmrt99(config-if)#
jpmtkvmrt99(config-if)#exit
jpmtkvmrt99(config)#
設定がある程度進んだらcommitコマンドを叩き、設定内容をシステムに反映させる。
次回起動時に設定内容を反映させるにはcommitコマンドを叩いた後にwrite memoryコマンドを叩く必要が有るが、commitコマンドもwrite memoryコマンドも実行タイミングはいつもで良い。修正や再設定等の手間を考慮すると、設定作業の最後に1度だけ実行するよりも所々の切りの良いタイミングで実行すると良いだろう。
残念な事にcommitが失敗した際は、以下のようなエラーを吐く。
エラーの内容から余計なコマンドや足りないコマンドを推測する事が出来る。
以下の例の場合、BGPピアを指定するコマンドやその周辺の設定が足りないのかなと推測する事が出来る。
実際に、neighbor 192.168.3.253 remote-as 65534を打った後に再度commitコマンドを叩いたらエラーは出力されずcommitが通った。
jpmtkvmrt99(config-router-af)#commit
% Configuration " /bgp/bgp-instance[bgp-as='65535']/peer[peer-address='192.168.3.253']/config/peer-description" depends on "/bgp/bgp-instance/peer/config/peer -
% Failed to commit .. As error(s) encountered during commit operation...
  Uncommitted configurations are retained in the current transaction session, check 'show transaction current'.
  Correct the reason for the failure and re-issue the commit.
  Use 'abort transaction' to terminate current transaction session and discard all uncommitted changes.
SMI error with info
jpmtkvmrt99(config-router-af)#
以下の例の場合は「%% Activate the neighbor for the address family first」の出力から neighbor 192.168.3.253 activate が足りない事を推測。BGPの設定でneighbor 192.168.3.253 activateを打った後に再度commitコマンドを叩いたら、エラーは出力されずcommitが通った。
jpmtkvmrt99(config-router-af)#commit
%% Activate the neighbor for the address family first -  /bgp/bgp-instance[bgp-as='65535']/peer[peer-address='192.168.3.253']/address-family[afi='ipv4'][safi='unicast']/route-map-filter[route-map-direction='out']/config
% Failed to commit .. As error(s) encountered during commit operation...
  Uncommitted configurations are retained in the current transaction session, check 'show transaction current'.
  Correct the reason for the failure and re-issue the commit.
  Use 'abort transaction' to terminate current transaction session and discard all uncommitted changes.
%% Activate the neighbor for the address family first
jpmtkvmrt99(config-router-af)#
jpmtkvmrt99(config-router-af)#abort transaction
設定コマンドの不足や間違い等の検討が付かずさっさとやりなおししたい場合は、abort transactionを叩いて設定の取り消しが可能である。直前に叩いたcommitコマンドの直後から設定コマンドの投入のやりなおしが出来る。
abort transactionを叩く前に show transaction currentを叩くと、やりなおし対象のコマンドが出力される。
2.外部向けルーティング(Static Route)の設定
次に、外部への通信の到達性確保の為にスタティックルートの設定を投入する。
今回は対向先のルータjpmtkvmrt98のLAN側に有るネットワークへのスタティックルートを2本、ループバックインターフェースlo0向けのスタティックルートを1本設定した。
設定を終えたらcommitコマンドを打ち、設定内容をシステムに反映させる。
jpmtkvmrt99(config)#ip route 192.168.156.0/24 192.168.3.253
jpmtkvmrt99(config)#ip route 192.168.157.0/24 192.168.3.253
jpmtkvmrt99(config)#ip route 10.1.1.98/32 192.168.3.253
jpmtkvmrt99(config)#
jpmtkvmrt99(config)#commit
3.外部向けルーティング(BGP)の設定
BGPの設定コマンドも某C社のものそのものだが、一部の設定は某C社のものとは異なりaddress-family ipv4 unicastの階層内で投入する必要が有る為、OcNOSに初めて触れる人はrouter bgp AS番号の後に投入するコマンドが弾かれて戸惑うかもしれない。
OcNOSでルートマップをBGPに適用させたい場合は、以下のようにaddress-family ipv4 unicastの階層内でneighbor xx.xx.xx.xx activateを投入する必要が有る。
設定を終えたらcommitコマンドを打ち、設定内容をシステムに反映させる。
jpmtkvmrt99(config)#router bgp 65535
jpmtkvmrt99(config-router)#bgp router-id 10.1.1.99
jpmtkvmrt99(config-router)#bgp log-neighbor-change
jpmtkvmrt99(config-router)#neighbor 192.168.3.253 remote-as 65534
jpmtkvmrt99(config-router)#neighbor 192.168.3.253 description *** jpmtkvmrt98 ***
jpmtkvmrt99(config-router)#neighbor 192.168.3.253 advertisement-interval 10
jpmtkvmrt99(config-router)#
jpmtkvmrt99(config-router)#address-family ipv4 unicast
jpmtkvmrt99(config-router-af)#network 10.1.1.99/32
jpmtkvmrt99(config-router-af)#network 192.168.56.0/24
jpmtkvmrt99(config-router-af)#network 192.168.57.0/24
jpmtkvmrt99(config-router-af)#redistribute connected
jpmtkvmrt99(config-router-af)#neighbor 192.168.3.253 activate
jpmtkvmrt99(config-router-af)#
jpmtkvmrt99(config-router-af)#commit
jpmtkvmrt99(config-router-af)#
jpmtkvmrt99(config-router-af)#exit
jpmtkvmrt99(config-router)#exit
jpmtkvmrt99(config)#
4.ルートマップの設定
制御したい経路情報は無いが、ルートマップやPrefix list等の設定コマンドが某C社のコマンドとどれだけ似ているかを確認する為、ルートマップで適合した経路情報をそのままPrefix Listに適用させる設定を投入した。
ルートマップやPrefix listのコマンドも某C社のものとほぼ同じである事が分かる。
設定を終えたらcommitコマンドを叩き設定内容をシステムに反映させた後、write memoryコマンドを叩きstartupコンフィグとして保存させる。
上記のBGPの設定にてBGPピアをアクティベートする設定を投入しないと、BGPにルートマップを適用させる設定を終えた後にcommitコマンドを叩くとエラーを吐く。
jpmtkvmrt99(config)#ip prefix-list ADV_TO_MAE-HOTAKA_PREFIX
jpmtkvmrt99(config-ip-prefix-list)#seq 10 permit 0.0.0.0/0 le 32
jpmtkvmrt99(config-ip-prefix-list)#exit
jpmtkvmrt99(config)#
jpmtkvmrt99(config)#route-map ADV_TO_MAE-HOTAKA_NW permit 100
jpmtkvmrt99(config-route-map)#match ip address prefix-list ADV_TO_MAE-HOTAKA_PREFIX
jpmtkvmrt99(config-route-map)#exit
jpmtkvmrt99(config)#
jpmtkvmrt99(config)#route-map ADV_TO_MAE-HOTAKA_NW deny 1000
jpmtkvmrt99(config-route-map)#exit
jpmtkvmrt99(config)#
jpmtkvmrt99(config)#router bgp 65535
jpmtkvmrt99(config-router)#address-family ipv4 unicast
jpmtkvmrt99(config-router-af)#neighbor 192.168.3.253 route-map ADV_TO_MAE-HOTAKA_PREFIX out
jpmtkvmrt99(config-router-af)#
jpmtkvmrt99(config-router-af)#commit
jpmtkvmrt99(config-router-af)#
jpmtkvmrt99(config-router-af)#end
jpmtkvmrt99#
jpmtkvmrt99#write memory
Building configuration...
[OK]
jpmtkvmrt99#
5.設定を初期化させたい場合
個々のコマンドを削除したい場合は、某C社のコマンドと同じく頭にnoを付けて対象の設定コマンドを叩く。全体的に設定を削除したい場合や工場出荷状態に戻したい場合は、copy empty-config startup-config コマンドを叩く。
Would you like to save them now? (y/n):と聞かれたら必ず n キーを叩き、runningコンフィグの内容をstartupコンフィグに保存させない。
Are you sure you would like to reset the system? (y/n):と聞かれたら y キーを叩きOcNOSを再起動させる。
jpmtkvmrt99#copy empty-config startup-config
% System Reboot is required for new startup config to take effect.
jpmtkvmrt99#
jpmtkvmrt99#
jpmtkvmrt99#
jpmtkvmrt99#reload
The system has unsaved changes.
Would you like to save them now? (y/n): n
Building Configuration...

Are you sure you would like to reset the system? (y/n): y
:
(再起動開始)
:
6.現段階の設定内容
上記までの設定を終えた段階の設定内容は以下のとおり。
ぱっと見、某C社のrunning-configのように見えるが、ルートマップやPrefixリストがインターフェースの設定の上側に有ったりスタティックルーティングの設定の下側がすっきりしていたり...といった感じで、某C社のshow running-configとの間で差分は大きい。
個人的には、!の改行だらけでスカスカなrunning-configよりOcNOSのrunning-configの方が好みである。
jpmtkvmrt99#show running-config
!
! Software version: DEMO_VM-OcNOS-SP-PLUS-x86-6.3.0.126-GA 06/02/2023 17:30:25
!
!Last configuration change at 20:33:13 JST Sun Mar 24 2024 by testuser
!
no service password-encryption
!
snmp-server enable traps link linkDown
snmp-server enable traps link linkUp
!
ip vrf management
!
hostname jpmtkvmrt99
no ip domain-lookup
ip domain-name localhost
ip domain-lookup vrf management
errdisable cause stp-bpdu-guard
feature telnet vrf management
feature ssh vrf management
feature ntp vrf management
ntp enable vrf management
username testuser role network-admin password encrypted $1$bJoWbJI0$0ya/AGdQVzw8o9ze//ovI/
feature rsyslog vrf management
!
ip prefix-list ADV_TO_MAE-HOTAKA_PREFIX
 seq 10 permit 0.0.0.0/0 le 32
!
route-map ADV_TO_MAE-HOTAKA_NW permit 100
 match ip address prefix-list ADV_TO_MAE-HOTAKA_PREFIX
!
route-map ADV_TO_MAE-HOTAKA_NW deny 1000
!
interface lo
 description *** Monitoring/Polling ***
 ip address 127.0.0.1/8
 ip address 10.1.1.99/32 secondary
 ipv6 address ::1/128
!
interface eth0
 description *** To Management NW ***
 ip vrf forwarding management
 ip address 192.168.3.100/25
!
interface eth1
 description *** To jpmtkvmrt98 ge1 ***
 ip address 192.168.3.254/30
!
interface eth2
 description *** To jpmtkvmsw01 ge0/0/0 ***
 ip address 192.168.56.10/24
!
interface eth3
 description *** To jpmtkvmsw02 ge0/0/0 ***
 ip address 192.168.57.10/24
!
 exit
!
router bgp 65535
 bgp router-id 10.1.1.99
 bgp log-neighbor-changes
 neighbor 192.168.3.253 remote-as 65534
 neighbor 192.168.3.253 description *** jpmtkvmrt98 ***
 neighbor 192.168.3.253 advertisement-interval 10
 !
 address-family ipv4 unicast
 network 10.1.1.99/32
 network 192.168.56.0/24
 network 192.168.57.0/24
 redistribute connected
 neighbor 192.168.3.253 activate
 neighbor 192.168.3.253 route-map ADV_TO_MAE-HOTAKA_PREFIX out
 exit-address-family
!
ip route 10.1.1.98/32 192.168.3.253
ip route 192.168.156.0/24 192.168.3.253
ip route 192.168.157.0/24 192.168.3.253
ip route vrf management 0.0.0.0/0 192.168.3.1 eth0
!
!
end

jpmtkvmrt99#
設定後の確認
設定が一通り完了した為、これよりステータスの確認に入る。
対向先のCisco CSR1000v(ホスト名:jpmtkvmrt98)の設定は、OcNOS VMの設定後に実施した。
以下は、ネットワーク屋おなじみのshow ip interface briefコマンドの内容。
ループバックインターフェースloの行は、上記にて設定したセカンダリのIPアドレス 10.1.1.99/32は出力されない。
jpmtkvmrt99#show ip interface brief

'*' - address is assigned by dhcp client

Interface            IP-Address      Admin-Status          Link-Status
eth0                 192.168.3.100   up                    up
eth1                 192.168.3.254   up                    up
eth2                 192.168.56.10   up                    up
eth3                 192.168.57.10   up                    up
lo                   127.0.0.1       up                    up
jpmtkvmrt99#
以下は、OcNOS VMのルーティングテーブルの内容。
出力フォーマットは某C社のものと若干異なっており、1つの経路情報に対し複数のNext Hopが存在する場合に選択されたNext Hopを示す「>」の出力が無い。
jpmtkvmrt99#show ip route
Codes: K - kernel, C - connected, S - static, R - RIP, B - BGP
       O - OSPF, IA - OSPF inter area
       N1 - OSPF NSSA external type 1, N2 - OSPF NSSA external type 2
       E1 - OSPF external type 1, E2 - OSPF external type 2
       i - IS-IS, L1 - IS-IS level-1, L2 - IS-IS level-2,
       ia - IS-IS inter area, E - EVPN,
       v - vrf leaked
       * - candidate default

IP Route Table for VRF "default"
S            10.1.1.98/32 [1/0] via 192.168.3.253, eth1, 00:06:49
C            10.1.1.99/32 is directly connected, lo, 00:06:52
C            127.0.0.0/8 is directly connected, lo, 00:06:52
B            192.168.3.0/24 [20/0] via 192.168.3.253, eth1, 00:05:28
C            192.168.3.252/30 is directly connected, eth1, 00:06:52
C            192.168.56.0/24 is directly connected, eth2, 00:06:52
C            192.168.57.0/24 is directly connected, eth3, 00:06:52
S            192.168.156.0/24 [1/0] via 192.168.3.253, eth1, 00:06:49
S            192.168.157.0/24 [1/0] via 192.168.3.253, eth1, 00:06:49

Gateway of last resort is not set
jpmtkvmrt99#
以下は、OcNOS VMのVRF managementのルーティングテーブルの内容。
管理用ネットワークはVRFで分けている事から別のルーティングテーブルを持っている為、確認したい場合はshow ip route vrf managementコマンドを別途打つ必要が有る。
jpmtkvmrt99#show ip route vrf management
Codes: K - kernel, C - connected, S - static, R - RIP, B - BGP
       O - OSPF, IA - OSPF inter area
       N1 - OSPF NSSA external type 1, N2 - OSPF NSSA external type 2
       E1 - OSPF external type 1, E2 - OSPF external type 2
       i - IS-IS, L1 - IS-IS level-1, L2 - IS-IS level-2,
       ia - IS-IS inter area, E - EVPN,
       v - vrf leaked
       * - candidate default

IP Route Table for VRF "management"
Gateway of last resort is 192.168.3.1 to network 0.0.0.0

S*           0.0.0.0/0 [1/0] via 192.168.3.1, eth0, 00:07:21
C            192.168.3.0/25 is directly connected, eth0, 00:07:24
jpmtkvmrt99#
以下は、OcNOS VMのBGPピアに関する要約情報の内容。
某C社の出力フォーマットに非常に似ているが簡略化されたような出力内容となっており、某C社のコマンドに慣れた方々でも内容の把握に決して難儀しないと思われる。
jpmtkvmrt99#show ip bgp summary
BGP router identifier 10.1.1.99, local AS number 65535
BGP table version is 2
2 BGP AS-PATH entries
0 BGP community entries

Neighbor                 V   AS   MsgRcv    MsgSen TblVer   InQ   OutQ    Up/Down   State/PfxRcd
192.168.3.253            4 65534   20         17       2      0      0  00:06:49               4

Total number of neighbors 1

Total number of Established sessions 1
jpmtkvmrt99#
以下は、OcNOS VMが持っているBGPテーブルの情報の内容。
対向先へのNext Hopおよびベストパスが出力されている事が分かる。
jpmtkvmrt99#show ip bgp
BGP table version is 2, local router ID is 10.1.1.99
Status codes: s suppressed, d damped, h history, a add-path, * valid, > best, i - internal,
              l - labeled, S Stale
Origin codes: i - IGP, e - EGP, ? - incomplete

    Network          Next Hop            Metric    LocPrf   Weight Path
*>   10.1.1.98/32     192.168.3.253        0        100       0   65534 i
*>   10.1.1.99/32     0.0.0.0              0        100       32768  i
*                     0.0.0.0              0        100       32768  ?
*>   192.168.3.0      192.168.3.253        0        100       0   65534 ?
*>   192.168.3.252/30 0.0.0.0              0        100       32768  ?
*>   192.168.56.0     0.0.0.0              0        100       32768  i
*                     0.0.0.0              0        100       32768  ?
*>   192.168.57.0     0.0.0.0              0        100       32768  i
*                     0.0.0.0              0        100       32768  ?
*>   192.168.156.0    192.168.3.253        0        100       0   65534 i
*>   192.168.157.0    192.168.3.253        0        100       0   65534 i

Total number of prefixes 8
jpmtkvmrt99#
以下は、BGPピアに関する詳細な情報の出力内容。
出力内容の5行目にてBGP state = Establishedが出力され、BGPピアの関係が正常に確立出来ている事が分かる。
また、出力内容の15行目あたりから下にかけて、設定したルートマップの適用状況が出力されている。
jpmtkvmrt99#show ip bgp neighbors
BGP neighbor is 192.168.3.253, remote AS 65534, local AS 65535, external link
 Description: *** jpmtkvmrt98 ***
  BGP version 4, local router ID 10.1.1.99, remote router ID 10.1.1.98
  BGP state = Established, up for 00:07:44
  Last read 00:00:02, hold time is 90, keepalive interval is 30 seconds
  Neighbor capabilities:
    Route refresh: advertised and received (old and new)
    4-Octet ASN Capability: received
    Address family IPv4 Unicast: advertised and received
  Received 22 messages, 0 notifications, 0 in queue
  Sent 20 messages, 0 notifications, 0 in queue
  Route refresh request: received 0, sent 0
  Minimum time between advertisement runs is 10 seconds

For address family: IPv4 Unicast  BGP table version 2, neighbor version 2
  Index 1, Offset 0, Mask 0x2
  Community attribute sent to this neighbor (both)
  Large Community attribute sent to this neighbor
  Outbound path policy configured
  Route map for outgoing advertisements is ADV_TO_MAE-HOTAKA_PREFIX
  4 accepted prefixes
  0 announced prefixes

 Connections established 1; dropped 0
Local host: 192.168.3.254, Local port: 179
Foreign host: 192.168.3.253, Foreign port: 12327
Nexthop: 192.168.3.254
Nexthop global: ::
Nexthop local: ::
BGP connection: non shared network

jpmtkvmrt99#
CPUやメモリー等OcNOSのリソース消費状況の概要を確認する際は、show system resourcesコマンドを叩く。
Load averageの行では過去1分間、5分間、15分間のCPU処理状況(CPUに割り当てられた待ちプロセス数)、Tasksの行ではシステム内のプロセスの数およびコマンドの発行時に実際に実行されているプロセスの数、%Cpu(s)の行ではOcNOSで動作しているプロセスのCPUの消費状況、MiB Memの行ではOcNOS内におけるメモリの消費状況を示す。
jpmtkvmrt99#show system resources
load average: 0.00, 0.03, 0.02
Tasks: 134 total,   1 running, 133 sleeping,   0 stopped,   0 zombie
%Cpu(s):  0.0 us,  6.2 sy,  0.0 ni, 93.8 id,  0.0 wa,  0.0 hi,  0.0 si,  0.0 st
MiB Mem :   3944.0 total,   3095.4 free,    447.8 used,    400.8 buff/cache

jpmtkvmrt99#
今回はここまで。
VMware FusionにデプロイしたOcNOS VMとVirtualBoxにデプロイしたCisco CSR1000vとの間で簡単なBGPのネットワークを構築し、OcNOS VMのコマンドの操作感やBGPの動作確認などを行なった。
初期設定を含め、スタティックルートやBGPの設定で使用するコマンドは某C社のものと極似しており、新規にOcNOSを導入および運用するにあたって気になる学習コストに関しては、コマンドが全く異なる他社のホワイトボックススイッチOSの製品と比較すると低くめに抑えられるのではないかと思われる。
OcNOS VMの使用期限は1年間につきまだまだ使える為、今後はBGP周りだけでなく他のL3ルーティングやルートマップ等もう少し掘り下げた内容の設定などを試してみたい。
参照サイトなど
IP Infusion社公式サイト
https://www.ipinfusion.com/ IP Infusion
https://www.ipinfusion.com/products/ocnos-vm/ OcNOS VM
https://www.ipinfusion.com/products/ocnos-sp/ OcNOS SP
https://www.ipinfusion.com/products/ocnos-ron/ OcNOS RON
https://www.ipinfusion.com/products/ocnos-dc/ OcNOS DC
https://www.ipinfusion.com/wp-content/uploads/2021/07/OcNOS-SP-4.2-Config-Guide.pdf OcNOS SP Configuration Guide
OcNOSの関連記事
https://debslink.hatenadiary.jp/entry/20240316/1710567015 OcNOSをVMware Fusionで動かす
https://debslink.hatenadiary.jp/entry/20240414/1713098990 OcNOSをVirtualBoxで動かす